
31 October 2026
How to Teach Handwriting at Home: A Step-by-Step Guide
Learning to write is like building a house. The pencil marks on the page are the part you can see, but they rest on a hidden structure of posture, strength, coordination and language. If that foundation is shaky, the writing suffers, however hard your child tries.
The good news is that handwriting is teachable. It isn't a talent some children are born with. It is a set of motor skills that develop in a predictable order, and when you teach in that order (body first, then hand, then letter, then word) progress often comes surprisingly quickly.
This guide walks through that order, with what to expect at each age and what to do when something isn't working.
Handwriting starts in the body, not the hand
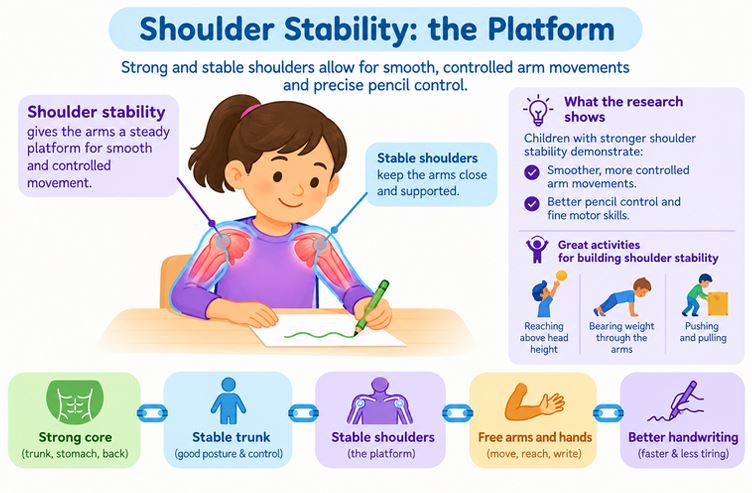
Handwriting is often thought of as a "hand skill". It is really a whole-body skill. Control grows from the centre of the body outwards: first the core, then the shoulders and arms, and last the fingers. Children need a steady trunk and stable shoulders before their fingers can move with precision.
Picture asking a child to draw a straight line while sitting on a wobbly chair. They will spend so much energy staying upright that very little is left for the pencil. A child with a weak core is in the same position. You may see slumping, leaning on the table, or legs wrapped around the chair legs. These are all signs of a body working too hard to stay still.
A few minutes of movement before writing helps more than a few extra minutes of pencil work:
- For the core: "Superman" pose lying on the tummy, crab walking, tug-of-war, or sitting on a therapy ball while doing a simple task.
- For the shoulders: wall push-ups, throwing a large ball overhead at a target, or hanging washing on the line.
- For crossing the middle of the body: touching the right hand to the left foot, big air-drawing, crawling and dancing.
One of the most useful handwriting supports costs nothing: write and draw on a vertical surface. An easel, a whiteboard or paper taped to the wall naturally steadies the shoulder and extends the wrist.
What to expect: how pencil grip develops
Every child passes through the same grip stages, and each one is a necessary stepping stone. A toddler grabbing a pencil in their fist isn't doing it wrong, and forcing a "correct" grip too early often just creates resistance.
- Whole-fist (palmar) grasp, roughly 1 to 1.5 years. Thick crayons and markers are ideal. Don't worry about neat lines.
- Wrist control. Children move the whole arm to mark the page. Easels and painting build the wrist control they need next.
- Pincer grasp, emerging around 1.5 years. The thumb and index finger start to work together.
- Tripod grasp, from about 2 to 3 years onward. The pencil rests on the thumb and index finger, with the middle finger underneath. Scribbling, drawing and playful mark-making build it, not formal letters.
Most children won't hold a regular pencil comfortably until around 4 to 5 years old. The tripod grip is the usual goal, but function beats perfection: a comfortable four-finger grip, or a slightly adapted tripod, is far better than a tense "correct" grip your child can't keep up.
Simple tools help. Short pencils, thick crayons and small pieces of broken crayon or chalk all encourage fingertip grip.
The teaching order: from scribbles to fluency
Good handwriting teaching doesn't march through the alphabet. It follows how children's movement skills actually develop: from big to small, from simple to complex, and from copying you to doing it independently.
Stage 1: Pre-writing (about ages 3 to 5)
Before letters, children need the strokes that every letter is made from. They usually arrive in this order: vertical and horizontal lines, circles, crosses, squares, then diagonals.
Keep it physical and playful. Practise strokes in sand, salt trays or shaving cream. Draw big shapes in the air or on a large sheet on the floor, so the whole arm learns the movement before the fingers are asked to. Draw letters on each other's backs and guess them.
Stage 2: Letter formation (about ages 5 to 7)
Letters have "recipes": a starting point, a direction and a stroke order. Children who invent their own often build habits that are hard to undo later. Teach the recipe, not just the finished shape.
Instead of alphabetical order, teach letters in families that share a movement:
- Straight down from the top: l, t, y, j, u, i
- One smooth stroke without lifting: r, n, m, h, b, p
- The "curly c" letters: c, o, a, d, g, q, s, f, e
- Diagonals and corners: v, w, z, x, k
Practising similar movements together builds confidence, reinforces the pattern and cuts down on reversals like b and d. For each new letter, move through five steps: you model it and say the same cue each time, the child traces it, then imitates it beside your model, then copies it from a card, and finally writes it from memory. Don't skip steps. The whole sequence takes only a few minutes per letter.
Free guide · 29 pages
The Building Blocks of Confident Writing
A free, illustrated guide to teaching handwriting, from a strong core to fluent cursive.
- Two ready-to-use weekly plans for the early years
- A step-by-step cursive plan: single letters, then joins, then words
- OT strategies for six common handwriting problems
- The S.O.S. spelling-and-writing routine, step by step
We'll also send up to two short emails to help you put it to work. Reply to any of them to stop.
Stage 3: Words and spacing (about ages 5 to 7)
Once letters are secure, move to names, short words like cat and sun, and simple phrases. Spacing and letter height now matter. Two ideas make them concrete:
- A "spaceman": a small stick or a finger placed between words to keep the gaps even.
- "Sky, grass and ground" lines: tall letters reach the sky, small letters sit in the grass, and letters like g and y hang into the ground.
Short and often beats long and rare. Five to ten minutes a day does more than an hour once a week.
Stage 4: Writing for a purpose (age 7 and up)
By now handwriting is a tool, not the goal. Use it for journals, labelling diagrams and stories. Warm up with a few minutes of shapes or patterns, write in short bursts with movement breaks, and teach your child to check their own spacing and size. That is the beginning of editing.
When should you start cursive?
Print first, cursive second. Most occupational therapists and teachers suggest building steady print writing through the early primary years, and starting cursive around the end of Year 2 or the start of Year 3, when children are around seven or eight.
Some research suggests cursive has extra benefits. The connected movement may help children see a word as one chunk, and every letter starts on the baseline, which can reduce b/d and p/q reversals. But it asks a lot of the brain. If a child is still working hard to form print letters, adding a second script too soon can cause confusion and frustration.
Your child may be ready when they:
- print with consistent size, spacing and alignment
- form most print letters without having to think about it
- can write a short paragraph without tiring
- show interest in "joined-up" writing
Keep print going for spelling tests and quick notes while cursive is introduced slowly. Start with the "curly c" family, practise big movements first, and teach each join as its own skill before using it in words.
Handwriting and spelling help each other
Handwriting and spelling are usually taught as separate subjects, but they improve faster together. When a child writes a word by hand while saying its letters, the brain stores the sound, the look and the movement of the word all at once.
Try these in your spelling practice:
- "Say it, build it, write it": call out a word, build it with magnetic letters, then write it in a notebook.
- Rainbow writing: write the word in pencil, then trace over it in different colours.
- Salt or sand tray spelling: write the word with a finger first, then with a pencil.
- Match the lists: choose spelling words that use the letter family you're practising in handwriting.
There's a bonus reason to care about neatness. If a child can't read back their own writing, they can't check their own spelling. That is a far more convincing reason for a child than "be neat".
Common handwriting problems and what helps
Messy handwriting is a symptom. The cause is usually one underlying skill that needs support, not a lack of effort. A few common patterns:
- Reversals and wrong starting points: use a green dot for the start, arrows for direction, and air writing before paper. Reversals are normal until around seven or eight.
- Letters of all different sizes: try grid paper, or sort letters into tall, small and falling.
- Cramped or floating words: use a spaceman, raised-line paper or a slant board.
- Pressing too hard or too light: weight-bearing play such as wall push-ups, or trying a pencil with more resistance.
- Tired, sore hands: build strength through play dough, tweezers, pegs and spray bottles, and keep writing to short bursts.
- An awkward grip: short pencils, broken crayons, and writing on a vertical surface.
When to ask for help
Most handwriting difficulties improve with targeted practice at home. It is worth asking an occupational therapist or your GP if you notice:
- reversals that continue past about age eight
- poor spacing and sizing alongside spelling difficulty, even though your child speaks and understands well (these can be signs of dysgraphia)
- refusing to write, so that learning is falling behind
- suspected dyslexia, ADHD or language delays affecting writing
- little improvement after about six months of steady, targeted work
Don't wait. Early support is far more effective than late correction.
Free guide · 29 pages
The Building Blocks of Confident Writing
A free, illustrated guide to teaching handwriting, from a strong core to fluent cursive.
- Two ready-to-use weekly plans for the early years
- A step-by-step cursive plan: single letters, then joins, then words
- OT strategies for six common handwriting problems
- The S.O.S. spelling-and-writing routine, step by step
We'll also send up to two short emails to help you put it to work. Reply to any of them to stop.
Homeschool-HQ records observations. It does not diagnose. This article is general information for Australian homeschooling families, not medical, psychological or educational advice.